Update: 已经更新 Github 代码: https://github.com/atarss/clip-image-search
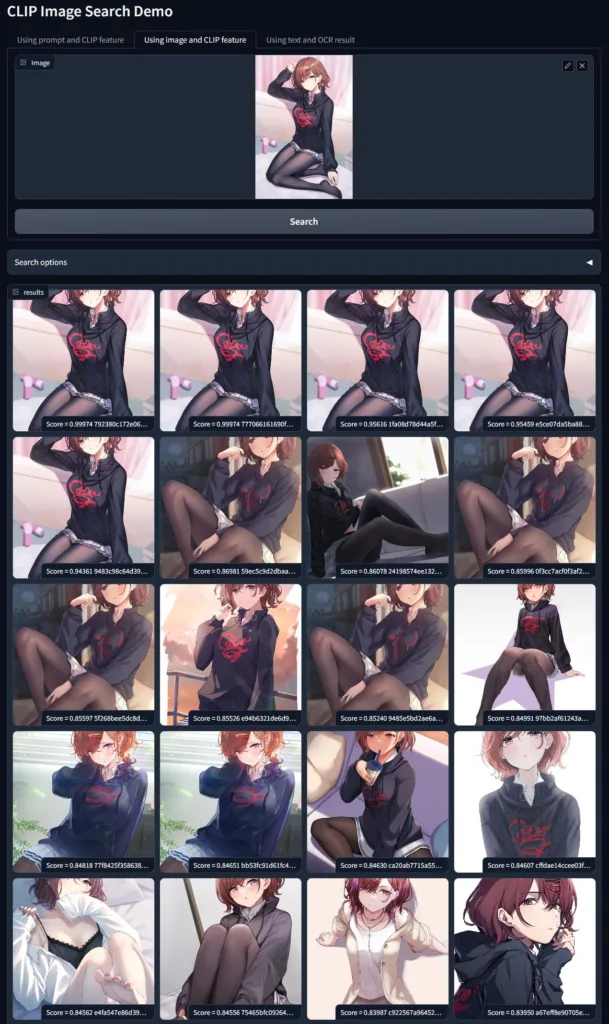
上周花了一周时间实现了一个简易的个人图像搜索引擎,可以实现以图搜图和用文字搜图的功能,效果如下:
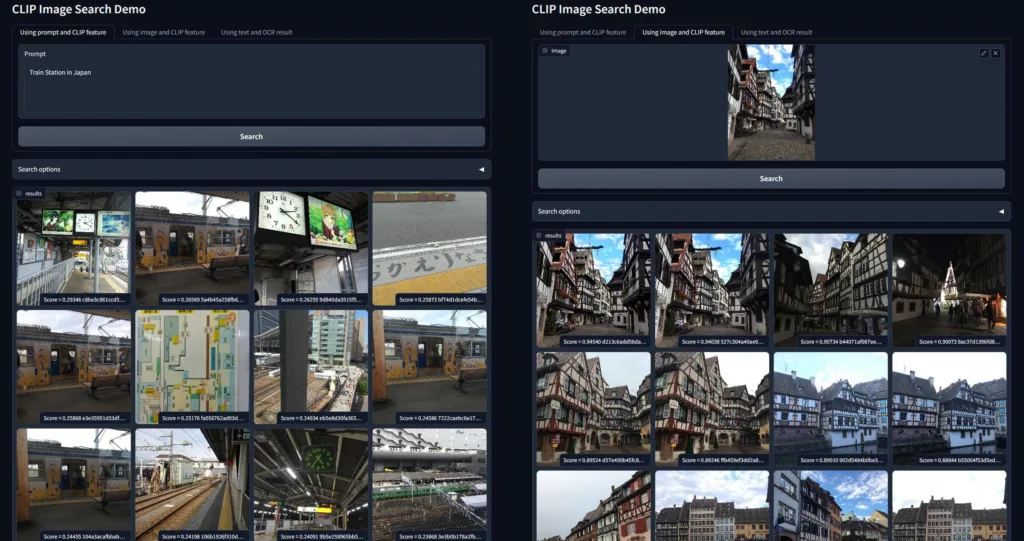
其中尝试图搜图的效果尤其好,远超出了我的预期。我之前用的 iPhone 相册和 Google Photos 自带的搜索已经被这个结果吊打了。看到这个效果我把我之前 QQ 群聊天记录的接近百万量级的图片都跑了一遍 CLIP Feature,简单搭了一个个人图片搜索引擎。这里把过程记录下来分享给大家。
背景
最开始是年初被同事安利了一个 iOS 的 app 叫 Queryable(寻隐),可以用文字搜图好像效果还不错。想到自己确实之前也遇到过有几张图我想给别人看,但自带的搜索功能完全没法快速找到,最后找半天也找不着只能作罢。之前听说这个正是用 CLIP Feature 实现的。上周正好有时间,想试下现在这个 CLIP 到底有多好用,就做了个简单的实验:
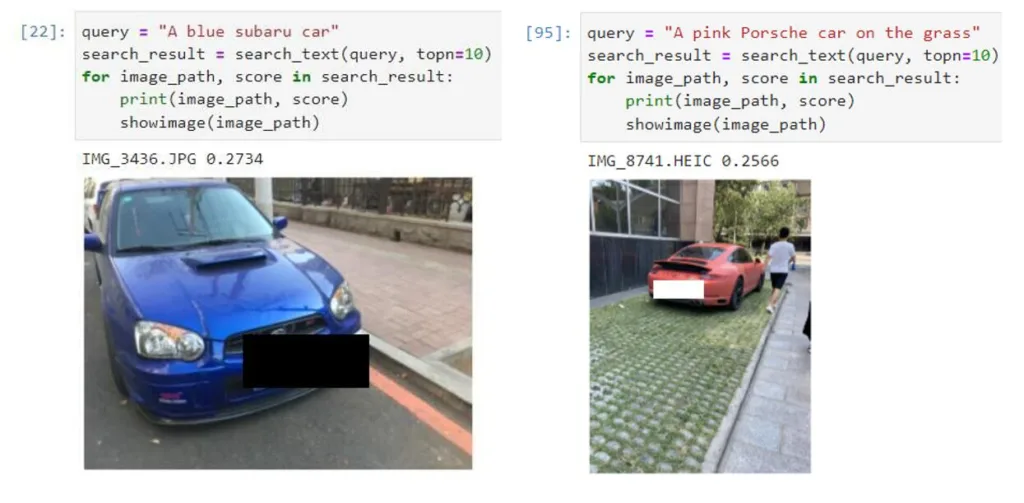
两张都是我自己拍到的汽车的照片,两次都遇到了“我想给人看我之前在路边见过很有趣的车”,之前用 iPhone 自带的搜索只能用 ‘Car’ 关键词,搜出来一大堆干扰项,想强调汽车的颜色和品牌是完全不现实的,而这里用更加详细的描述(蓝色的 Subaru / 粉色的保时捷)直接就可以快速搜索到了。

为什么 CLIP 这么好用,因为 CLIP 在训练的时候会同时监督图像与文本标签的内容,使得不管文字和图像都会被编码到同一个空间上,这样就可以在同一个空间上度量图像特征和文本特征。当然这个只是所谓理论,具体还得看实际效果,后面会有我自己图库上的搜索展示。
设计思路与实现
- 图像来源:iPhone 可以直接用 iTunes 导入手机相册的原始图片到电脑里面。Google Photo 可以用 Takeout 导出数据然后下载下来,包含原始文件和用 json 形式存储的 meta 信息。QQ 和 Dingtalk 之类的需要去翻软件的数据存储目录,Wechat 我想搞但还没找到合适的导出数据方法……
- 图片存储:由于 QQ 群聊图片数量巨大,因此找了块垃圾 SSD 用来存储,直接存到文件系统上面,考虑去重图像会计算一个 MD5 Hash。
- 特征提取:使用的是 Github 上 OpenAI 官方的 CLIP 库。计算特征前图片会 Center Crop 到 224×224 尺寸。使用了
"ViT-L/14"模型,输出 768 维的 Feature。 - 特征存储:用了 MongoDB(对着 ChatGPT 现学的),特征实际上是 FP16 类型所以一张图的特征是 1536 字节,如果使用小一点的模型特征也可以更小。
- 搜索前端:现学了 Gradio,做这类 Demo 还挺好用。
特征提取与入库
注意在 CUDA 上跑的时候默认输出是 FP16,而 CPU 上的模型调用就只能输出 FP32 了,如果后面要在 CPU 上继续处理的话需要对齐一下类型
CLIP_MODEL = "ViT-L/14"
IMAGE_DIR = "/mnt/e/temp/iphone-import"
CLIP_MODEL_DOWNLOAD_ROOT = "/home/andy/dev/CLIP-dev/model"

def main():
    IMAGE_PATH_LIST = sorted(glob(os.path.join(IMAGE_DIR, "*.*")))
    IMAGE_PATH_LIST = [i for i in IMAGE_PATH_LIST if not (i.endswith(".GIF") or i.endswith(".MP4") or i.endswith("AAE"))]
    print("Found {} images".format(len(IMAGE_PATH_LIST)))

    device = "cuda"

    model, preprocess = clip.load(CLIP_MODEL, device=device, download_root=CLIP_MODEL_DOWNLOAD_ROOT)
    feature_dict = {}

    for image_path in tqdm(IMAGE_PATH_LIST):
        image_basename = os.path.basename(image_path)

        image = preprocess(Image.open(image_path))
        image = image.unsqueeze(0).to(device)

        with torch.no_grad():
            image_feat = model.encode_image(image)
            image_feat = image_feat.detach().cpu().numpy()  # It is still FP16 on CPU Here

        feature_dict[image_basename] = image_feat
入库时会同时包含图片的创建日期、尺寸、扩展名等,方便后面检索用
image_feat_bytes = image_feat.tobytes()
stat = os.stat(image_path)
image_filesize = stat.st_size
image_mtime = datetime.fromtimestamp(stat.st_mtime)
image_datestr = image_mtime.strftime("%Y-%m-%dT%H:%M:%S.%fZ")

image_width, image_height = image_shape

document = {
    'filename': os.path.basename(image_path),
    'extension': image_path.split(".")[-1],
    'importance': TARGET_IMPORTANCE,
    'height': image_height,
    'width': image_width,
    'filesize': image_filesize,
    'date': image_datestr,
    'feature': image_feat_bytes,
}

x = collection.insert_one(document)
检索与前端设计
目前检索是从 MongoDB 上一口气把全部特征都 fetch 下来然后直接算 cosine distance。时间基本会花在 MongoDB 的检索上面。检索这里基本思路就是按照距离排序,算是任何检索系统都会用到的核心代码了。
这里检索引入了上面我们考虑到的“根据图像 meta 信息做预筛选”的条件。
cos_similarity = torch.nn.CosineSimilarity(dim=1, eps=1e-6)

def calc_cpu_compare(query_feature, feature_list):
    time_start = time.time()
    feature_list = torch.from_numpy(feature_list.astype('float32'))
    sim_score = cos_similarity(query_feature, feature_list).detach().numpy()
    time_end = time.time()
    # print("[DEBUG] calculate cos distance {} for {:.6f}s".format(feature_list.shape, (time_end - time_start)))
    return sim_score

def search_nearest_image_feature(
        query_feature,
        topn=20,
        minimum_width=0, minimum_height=0,
        minimum_importance=0, extension_choice=[],
        mongo_collection=None):
    assert isinstance(minimum_height, int) and isinstance(minimum_width, int)
    assert mongo_collection is not None
    # find all image filename and features
    mongo_query_dict = {}
    if minimum_width > 0:
        mongo_query_dict["width"] = {"$gte": minimum_width}
    if minimum_height > 0:
        mongo_query_dict["height"] = {"$gte": minimum_height}
    if minimum_importance > 0:
        mongo_query_dict["importance"] = {"$gte": minimum_importance}
    if len(extension_choice) > 0:
        mongo_query_dict["extension"] = {"$in": extension_choice}

    cursor = mongo_collection.find(mongo_query_dict, {"_id": 0, "filename": 1, "feature": 1})

    with torch.no_grad():
        if DEVICE == "cpu":
            feature_list = []
            filename_list = []
            sim_score_list = []
            query_feature = query_feature.astype('float32').reshape(1, 768)
            query_feature = torch.from_numpy(query_feature)

            for doc in cursor:
                feature_list.append(np.frombuffer(doc["feature"], "float16"))
                filename_list.append(doc["filename"])

                if len(feature_list) >= MAX_SPLIT_SIZE:
                    feature_list = np.array(feature_list)
                    sim_score_list.append(calc_cpu_compare(query_feature, feature_list))
                    feature_list = []
                    # filename_list = []
            if len(feature_list) > 0:
                feature_list = np.array(feature_list)
                sim_score_list.append(calc_cpu_compare(query_feature, feature_list))

            if len(sim_score_list) == 0:
                return [], []

            sim_score = np.concatenate(sim_score_list, axis=0)
            print("[DEBUG] len(sim_score) = {}".format(len(sim_score)))

    top_n_idx = np.argsort(sim_score)[::-1][:topn]
    top_n_filename = [filename_list[idx] for idx in top_n_idx]
    top_n_score = [sim_score[idx] for idx in top_n_idx]

    return top_n_filename, top_n_score
前端这里使用了 Gradio,感觉非常适合个人做 Demo 用,自带的 Image 控件支持拖拽导入也非常适合我们的图搜图场景:
with gr.Blocks() as demo:
    heading = gr.Markdown("# CLIP Image Search Demo")

    # Use tabs
    with gr.Tab("Using prompt and CLIP feature"):
        prompt_textbox = gr.Textbox(lines=4, label="Prompt")
        button_prompt = gr.Button("Search").style(size="lg")
    with gr.Tab("Using image and CLIP feature"):
        input_image = gr.Image(label="Image", type="pil")
        button_image = gr.Button("Search").style(size="lg")

    with gr.Accordion("Search options", open=False):
        extension_choice = gr.CheckboxGroup(["jpg", "png", "gif"], label="extension", info="choose extension for search")
        with gr.Row():
            topn = gr.Number(value=64, label="topn")
            minimum_width = gr.Number(value=0, label="minimum_width")
            minimun_height = gr.Number(value=0, label="minimum_height")
            minimun_importance = gr.Number(value=0, label="minimum_importance")

    gr_gallery = gr.Gallery(label="results").style(grid=4, height=6)

    button_prompt.click(submit, inputs=[prompt_textbox, topn, minimum_width, minimun_height, minimun_importance, extension_choice], outputs=[gr_gallery])
    button_image.click(submit, inputs=[input_image, topn, minimum_width, minimun_height, minimun_importance, extension_choice], outputs=[gr_gallery])

demo.launch()
代码性能分析
这里分成两部分,一个是整个数据库初始化的操作,另一个是数据库建好之后的检索操作。
建库其实比较花时间,我在 Windows 10 的 WSL 下跑的 CUDA,具体数字不太记得,但大概是一小时跑 100k 数量图片的量级。我整个数据库全跑完大概要半天的时间。
检索的时间很大一部分来自于 MongoDB 查找(把百万量级的 feature 拿出来)。而算特征距离的速度,我实测每 8192 张图需要 20ms 左右,百万量级图片全算一遍距离需要 2~3s,估计还有不少优化空间。最后完整实测,一次全量搜索计算百万特征距然后找出 top N 在我 NAS 的 i3-10105T CPU 下需要 6~7s 的时间。
跑服务的话,因为 CLIP 模型要常驻内存,我用的 “ViT-L/14” 比较大,大概要占用 2~3GB 的内存,加上 mongodb 也要占用 1~2GB,不少 NAS 可能有些吃力,但 PC 一般问题不大。
效果展示与吐槽
首先是我发现 CLIP 模型是有一定 OCR 能力的。我先尝试搜索了一个 “anime screenshot with captions” 想搜一些动画截图。发现第一张图里面的英文文本是 “Your code’s buggy. We can’t sell this product.”,神奇的是竟然可以用这串文字也搜到同样的图。感觉 CLIP 模型也不算特别大,竟然已经训练出来还不错的 OCR 能力了。可惜就是 CLIP 对中文理解能力几乎为零完全没法用。

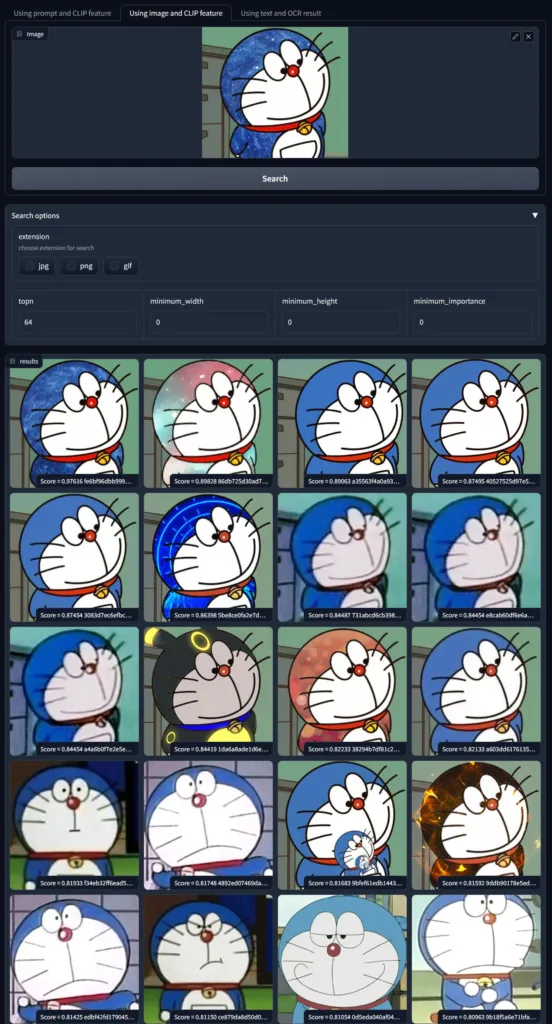
另外我还发现,有了百万量级的 QQ 群聊记录之后,这个搜索引擎非常适合搜 meme 表情包还有动画角色。比如下面这些表情包:
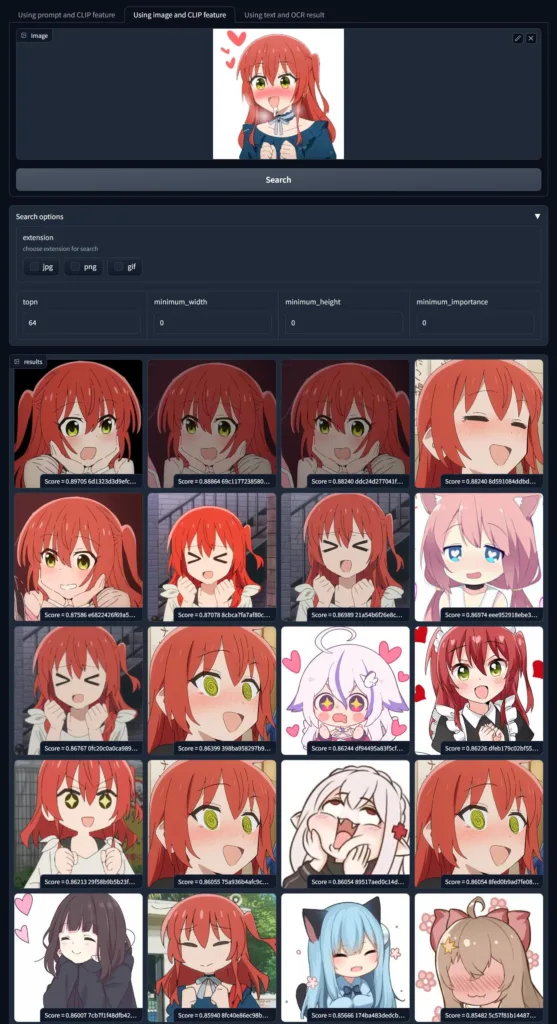
另外我也尝试给它一些没见过的动画角色(远晚于模型出现时间的角色),它也似乎能“认识”这些角色并且结果上搜索出相同角色的图片。
不管模型是不是真正知道角色的定义,但至少模型能通过语义上找出新的图片同样包含旧图片上的元素。这些组合其实正是人类对一个新角色的定义,能实现这样程度的检索已经非常令人惊喜了。而以前我看到的“图搜图”更多还是在传统图像特征的空间上找近邻,现在模型相比之下更像是“理解了图片的内容了”。
最后还有一个值得注意的现象:在我尝试用文字搜图的时候,相似度基本只有 0.2~0.3,0.3 就已经是非常高的相似度了。而用图片搜图的时候 0.8~0.9 的相似度都十分常见。这里面有几个解释:
- 某同学强调图像的 Space 与文本的 Space 还是有 bias,跨模态需要对齐才能达到更好的效果。同模态对比相似度高而跨模态相似度低是很正常的。
- 而我的观点是,图像包含的信息显然不是几个单词就能描述清楚的,比如正常拍一个人像照片,可能简单的描述就是这个人是谁,长什么样子;但实际上还有很多不在这个描述里的信息也会被计算进 Feature 里面,比如背景有什么内容,图像的清晰度如何,有没有大光圈带来的虚化,人穿了哪些衣服哪些手势,有什么表情姿势等等。因此文字到图片的对比实际上是【最有代表性的描述】去比对【对图片尽可能完全的全量描述】,自然这种情况下文字对图片的距离更远,而图与图之间的距离更近了。
Limitations and TODO
- CLIP 模型完全不能理解英语之外的语言,prompt 只能写英语,中文日文都抓瞎(但是有 Chinese-CLIP 或许也能用?)。
- CLIP 模型还是有些限制的。224×224 的 Center Crop 导致它其实不会处理被 Crop 掉的边缘信息。搜图的时候会因此丢结果。
- 现在我们发现 CLIP 模型有一定的 OCR 能力了,但似乎还不太够(也包括它只能理解英语)。如果想准确查询图片里的文字(比如找个名字、手机号、身份证号之类的),我希望能引入 OCR + 文字检索功能,更好地实现我个人“找图”的需求。这个已经在做了而且可以再水一篇 Blog(?)【Update:已更新】
- 如果能让我看过的图(不只 QQ 群),包括微信、Twitter 等图片来源都能自动入库的话,我后面找图的图库会大很多。需要一个自动导入的模块。
- 真正画饼的话,我希望 ChatGPT 级别的智能可以有更强的处理私人信息的能力,能够总结和检索跨模态的信息(图像文字声音视频)。最近看 plugin 出来 ChatGPT Plugins 里已经有了一个可以吃到外部信息的 API 实现: ChatGPT Retrieval Plugin,如果这个能力能集成到开源模型里面,相信以后的工作生活方式会发生很大的变化。
参考
- CLIP 的 Paper: Learning Transferable Visual Models From Natural Language Supervision
- Queryable / 寻隐 App 以及背后的开发过程
好
iPhone 的照片来源可以考虑使用 icloudpd,GitHub 开源,也有 Docker 版本。
特征存储、检索、算距离啥的应该都有一些开源的近似查找方案,也许数量级大了可以用得上。比如Faiss
是的,可以试试Faiss这类向量搜索方案,选一些带压缩的近似算法,语义匹配度和检索速度应该能找到一个平衡。
另外既然上CLIP了,可以试试搜索的时候用以图搜图+文字搜索结合,或许能搞出类似positive/negative prompt的效果?
向量搜索用 Faiss 我试了下还不错,提升很明显。
后面那个事情我感觉核心还是自己控制不同检索条件的权重,加上positive / negative 条件之后感觉 UI 交互就会有点麻烦了,还没想好要怎么写
您好 我下载下来您的项目之后,发现传入图片和文字都不能搜这是为什么呢
你可以在 github 把你具体的环境和详细报错信息提交到项目 issue 里面,这个 blog 不是一个适合讨论修 bug 的地方
我猜可能是我陈旧的代码已经不适应最新的环境了